Setup
Set up VRseBuilder SDK in a clean Unity 6 project. This guide follows the recommended package-based installation path: create a fresh URP project, add the VRseBuilder scoped registry, install the Access package, sign in, and let the SDK install the Core package for you.
Prefer video? Watch How to Setup Guide, 0.6.3.
Target Unity version: 6000.3.19f1
Project template: Universal Render Pipeline (URP)
Unity package installation changes your project. Keep the project under version control and let Unity finish each package import, script compilation, domain reload, and restart before continuing.
Before You Begin
Prepare the following before starting the SDK installation:
- Unity Hub with Unity Editor
6000.3.19f1installed - A VRseBuilder account with access to SDK packages
- A stable internet connection for package downloads
- A new or disposable Unity project for first-time setup validation
1. Create a Fresh Unity 6 URP Project
Start from a clean URP project so package setup is predictable.
- Open Unity Hub.
- Install or select Unity Editor
6000.3.19f1. - Select New project.
- Choose Universal 3D (URP/SRP).
- Set the project name and location.
- Select Create project.
- Wait for Unity to open the project and finish the first import.
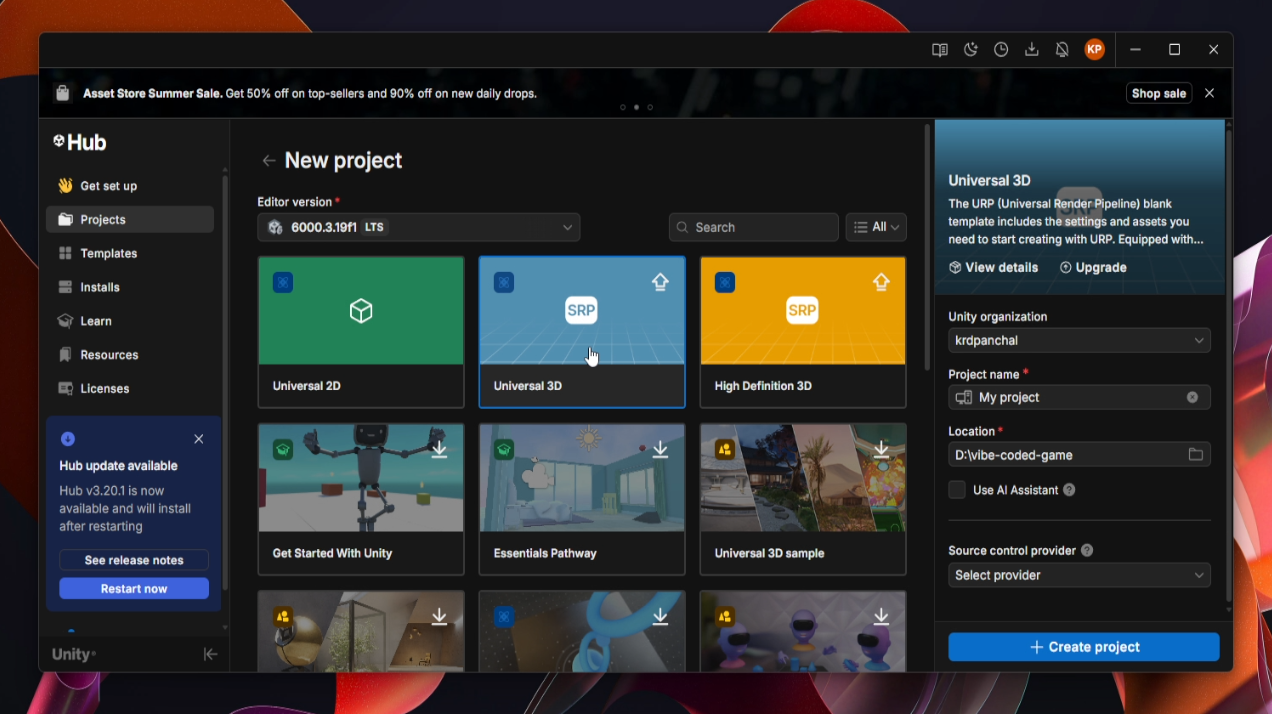
Use the Universal 3D template so the project starts with URP configuration already in place.
Target Build Platform Selection:
By default, new Unity projects open targeting Windows, Mac & Linux Standalone. Switch your target platform depending on your VRseBuilder deployment use case:
- Standalone VR (e.g., Meta Quest): Open File > Build Profiles (or File > Build Settings), select Android, and click Switch Platform.
- PC VR / Desktop Editor Testing: Keep Windows, Mac & Linux Standalone selected.
Switching the platform now before adding packages prevents long asset re-import times later.
2. Add the VRseBuilder Scoped Registry
Unity Package Manager needs the VRseBuilder package registry before it can discover SDK packages.
- In Unity, open Edit > Project Settings.
- Select Package Manager.
- Under Scoped Registries, select +.
- Add this registry entry:
| Field | Value |
|---|---|
| Name | VRseBuilder |
| URL | https://npm.autovrse.app |
| Scopes | com.autovrse.vrsebuilder |
- Select Save or apply the Project Settings changes.
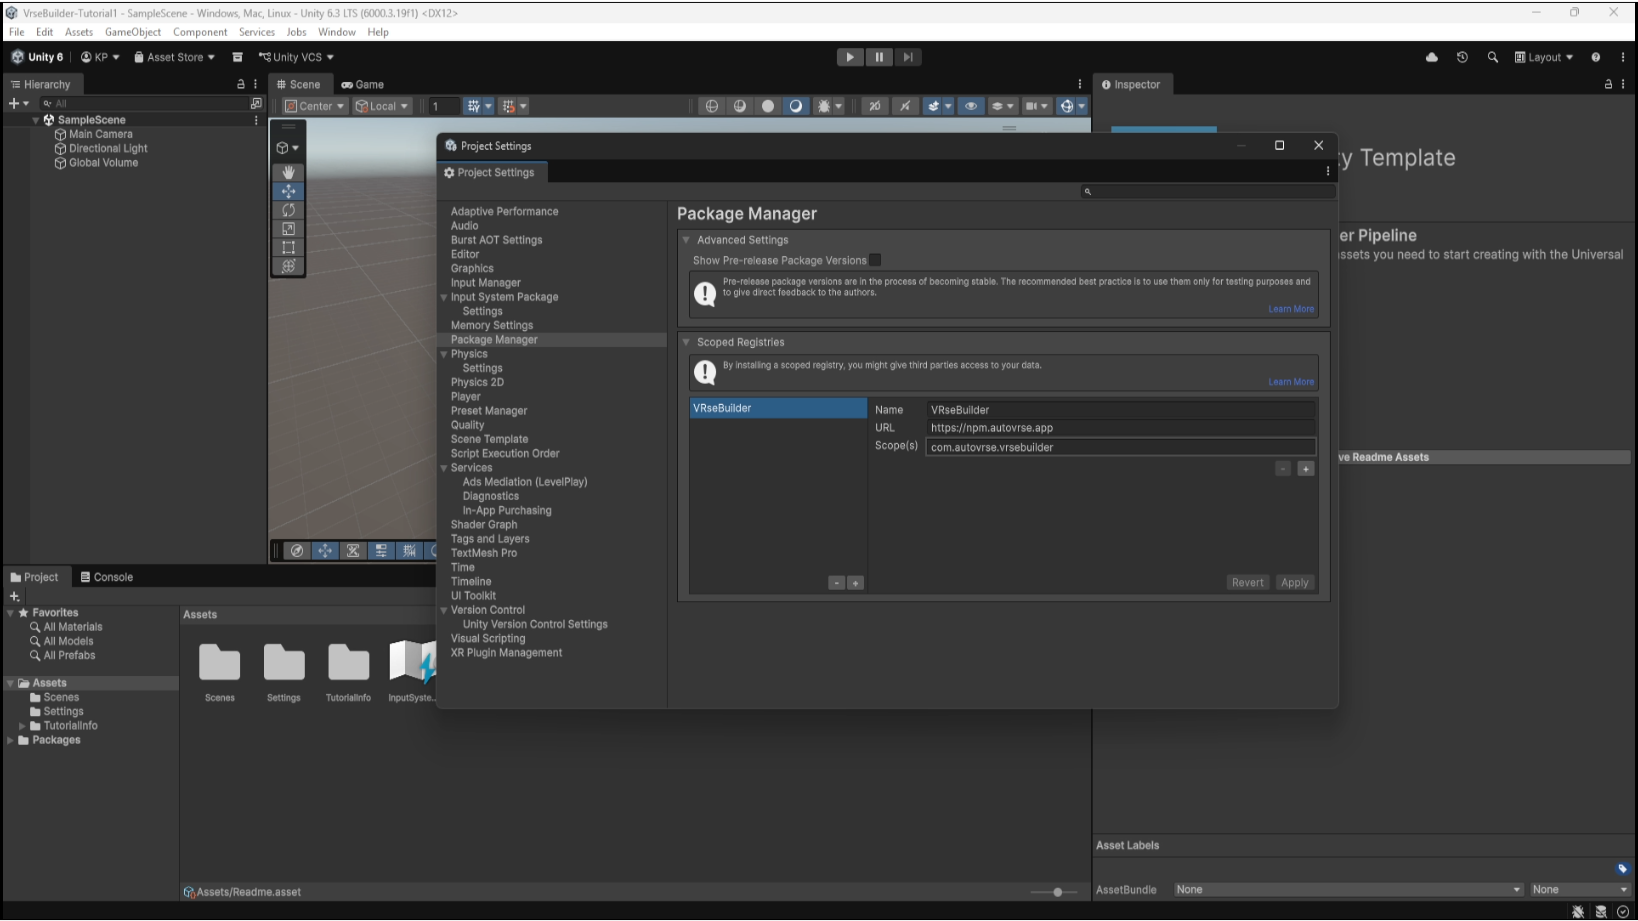
Add only the com.autovrse.vrsebuilder scope at this stage. Additional scopes, such as media.lightside, are added automatically by the SDK setup flow after login when they are needed.
3. Install VRseBuilder Access
The Access package adds the login flow and installer entry points that bootstrap the rest of the SDK.
- Open Window > Package Management > Package Manager.
- Set the package source dropdown to My Registries or Packages: My Registries.
- Select VRseBuilder Access.
- Confirm the package ID is
com.autovrse.vrsebuilder.access. - Select Install.
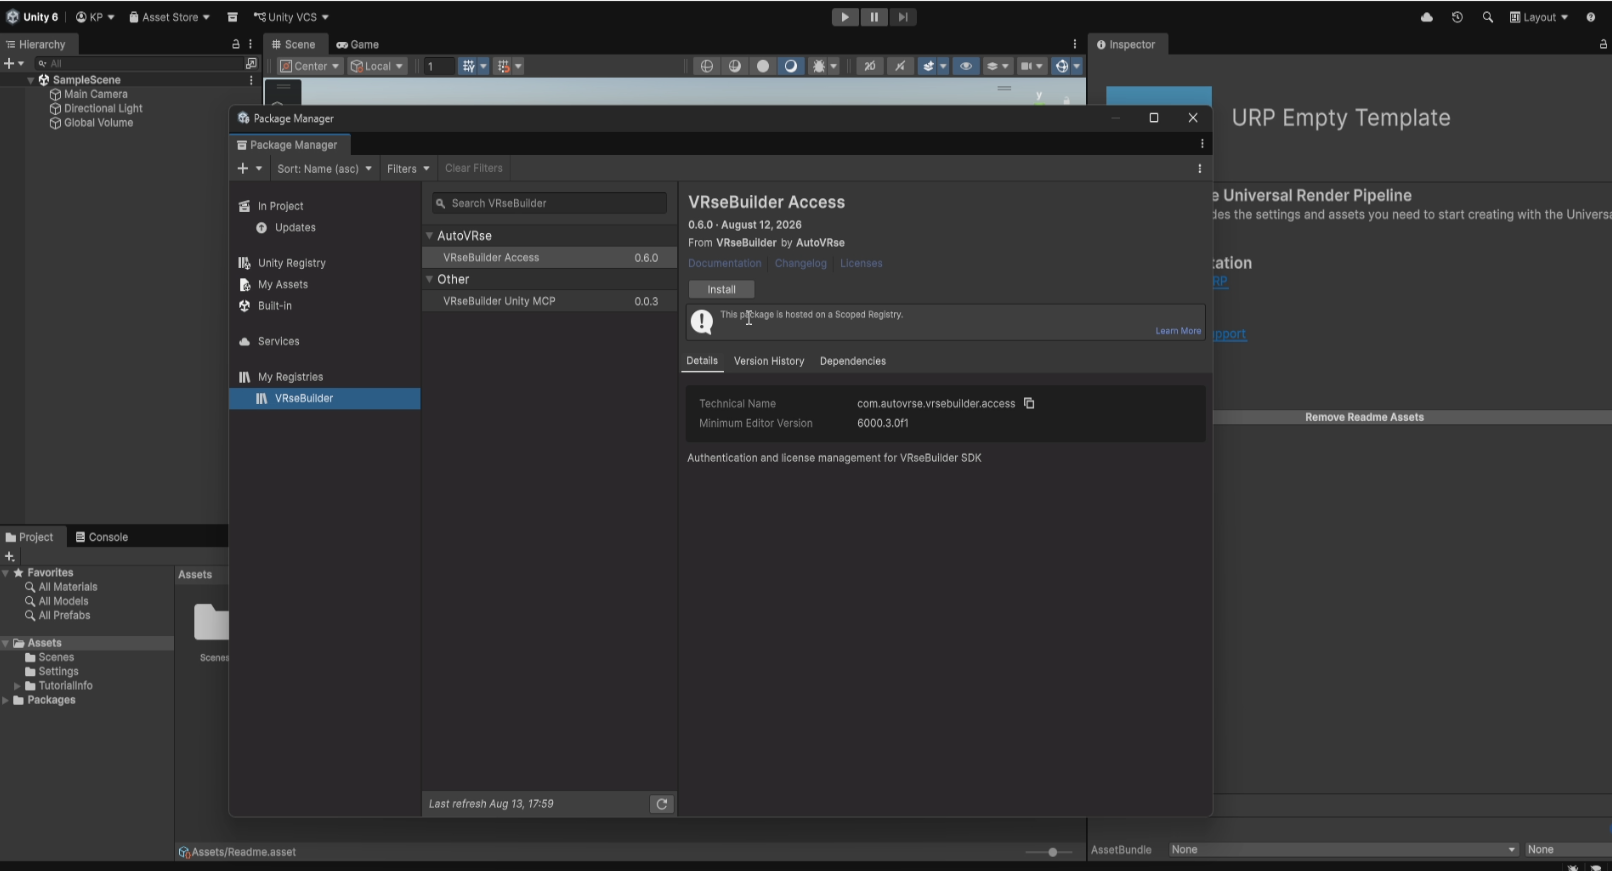
Install VRseBuilder Access first. It unlocks the login window and starts the guided SDK installation flow.
If Unity shows a Signature missing message for the Access package, you can continue with installation.
4. Sign In To VRseBuilder
After Access installs, Unity should open the VRseBuilder Login window automatically.
If the login window does not open, use VRseBuilder > Auth > Login from the Unity menu bar.
-
Optional: expand Advanced only if your team uses a custom API base URL.
-
Keep the default API base URL unless you were given a different environment:
https://api-pulse.autovrse.app/api -
Enter your Username and Password.
-
Select Sign In.
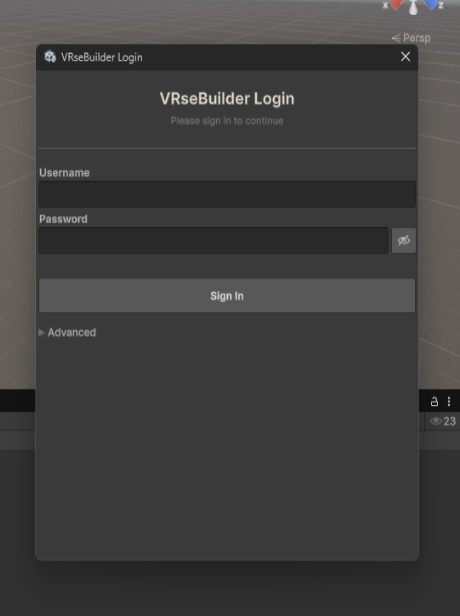
Use your VRseBuilder credentials to authenticate the package installer.
After a successful login, VRseBuilder starts installing VRseBuilder SDK (Core) automatically. The Core package ID is com.autovrse.vrsebuilder.core.
This download can take a few minutes depending on your connection speed. Do not close Unity while the package is downloading, importing, or compiling.
5. Restart Unity And Confirm Core
Unity may ask for an Editor restart after the Core package is added.
- In the Editor Restart Required dialog, select Restart Now.
- Wait for Unity to reopen the project.
- Open Package Manager and confirm VRseBuilder Core is installed.
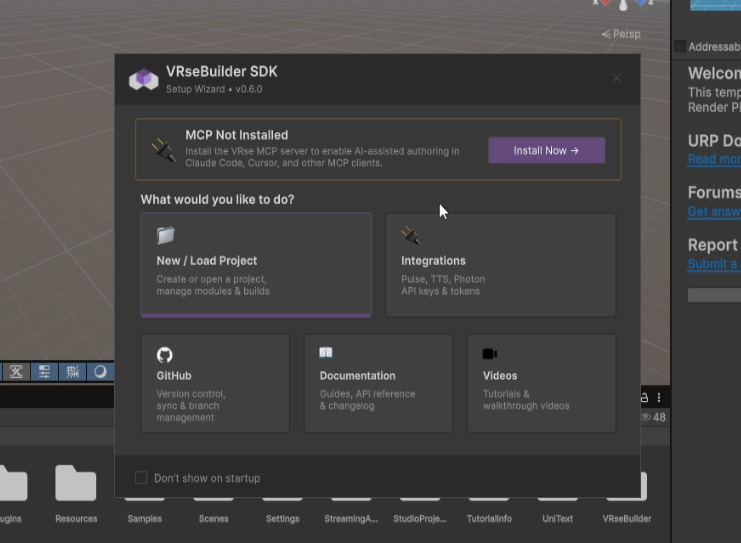
Restart when prompted so Unity can reload assemblies and complete SDK initialization cleanly.
6. Install the Photon SDK Bundle
Install Photon after Core is ready. This gives VRseBuilder the networking packages it expects for multiplayer and voice-enabled experiences.
- In Unity, open VRseBuilder > Projects Hub.
- Open Settings.
- Open Packages.
- Find Photon SDK Bundle.
- Select Install.
The bundle installs the required Photon packages for VRseBuilder, including Fusion, Voice, and Fusion Physics.
7. Install the Sample Project
Install the Sample Project as the final setup step. It gives you a complete reference project you can open and study so you can see how a finished VRseBuilder training module is structured.
- Open VRseBuilder > Projects Hub > Settings > Packages.
- Find Sample Project.
- Select Install.
- Open the sample after installation and use it as a reference before building your first production module.
VRseBuilder Packages
After the SDK is installed, use VRseBuilder > Projects Hub > Settings > Packages to install and manage tools around the core SDK.
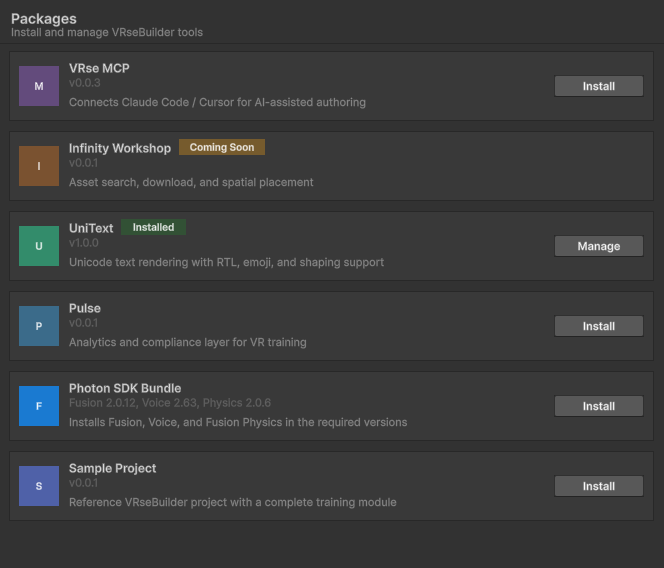
Required SDK Packages
| Package | What it provides |
|---|---|
| VRseBuilder Access | Login, authentication, and installer entry points. Install or update this package before Core so you can authenticate with VRseBuilder. |
| VRseBuilder Core | The main VRseBuilder SDK package. It adds the editor tools, runtime systems, story tooling, object setup workflows, and project/module authoring features used by VRseBuilder experiences. |
Optional Tools And Add-ons
| Package | What it provides |
|---|---|
| VRse MCP | Connects Claude Code / Cursor for AI-assisted authoring. See VRseBuilder Unity MCP Setup, or watch How to Setup MCP. |
| UniText | Unicode text rendering with RTL, emoji, and shaping support. |
| Pulse | Analytics and compliance layer for VR training. This package is marked Coming Soon in the Packages tab. |
| Photon SDK Bundle | Installs Fusion, Voice, and Fusion Physics in the required versions. |
| Sample Project | Reference VRseBuilder project with a complete training module. |
Update VRseBuilder
Use Unity Package Manager when updating an existing project. Unity's Manual resolve action forces Package Manager to resolve the project's packages again; if needed, Unity reinstalls altered or missing packages and removes packages that should no longer be present.
- Open Window > Package Management > Package Manager.
- Select My Registries > VRseBuilder.
- Open the Package Manager Advanced menu, shown as the settings/three-dots menu depending on your Unity version.
- Select Manual resolve and wait for Unity to finish resolving packages.
- Select VRseBuilder Access and update it first.
- Sign in again with your VRseBuilder credentials if Unity prompts you, or open VRseBuilder > Auth > Login manually.
- After Access is updated and you are signed in, select VRseBuilder Core and update it.
- Let Unity finish downloading, importing, compiling, and restarting if prompted.
Update VRseBuilder Access before VRseBuilder Core. Core updates rely on the current Access package and an authenticated VRseBuilder session.
If Package Manager Cannot Find The Registry
In some projects, Unity Package Manager can fail to find the VRseBuilder registry after package configuration issues. This is more likely while VRseBuilder packages are still unsigned.
If Manual resolve and reopening Unity do not restore the registry, reset the user Package Manager config:
- Close Unity.
- Go to your Windows user folder, for example
C:\Users\<your-user>. - Delete
.upmconfig.tomlif it exists. Unity stores this user Package Manager config at%USERPROFILE%\.upmconfig.toml. - Reopen Unity, add the VRseBuilder scoped registry again if needed, then run Manual resolve from Package Manager.
Next Steps
Unity SDK Overview
Learn what the SDK provides and how the major systems fit together.
MCP Setup
Connect Cursor, Claude Code, or another MCP client to Unity.
Editor Tools
Create projects, modules, experiences, scenes, chapters, and moments.
Interactables
Add grabbables, place points, touch targets, and other scene objects.