> ## Documentation Index
> Fetch the complete documentation index at: https://docs-vrsebuilder.autovrse.app/llms.txt
> Use this file to discover all available pages before exploring further.
# Editor Tools
> Setup your Studio generated story in Unity
As of [VRse Builder 0.5.2](/changelog/overview) project creation related setup has been moved to Studio, read more about [how to create a project on studio](/studio/projects).
Once you have a project on studio and generated and [published ](/studio/exporting)a story, you will be able to setup your project in Unity following the steps below.
## Access the Unity Tools
### Via VRse Tools Overlay
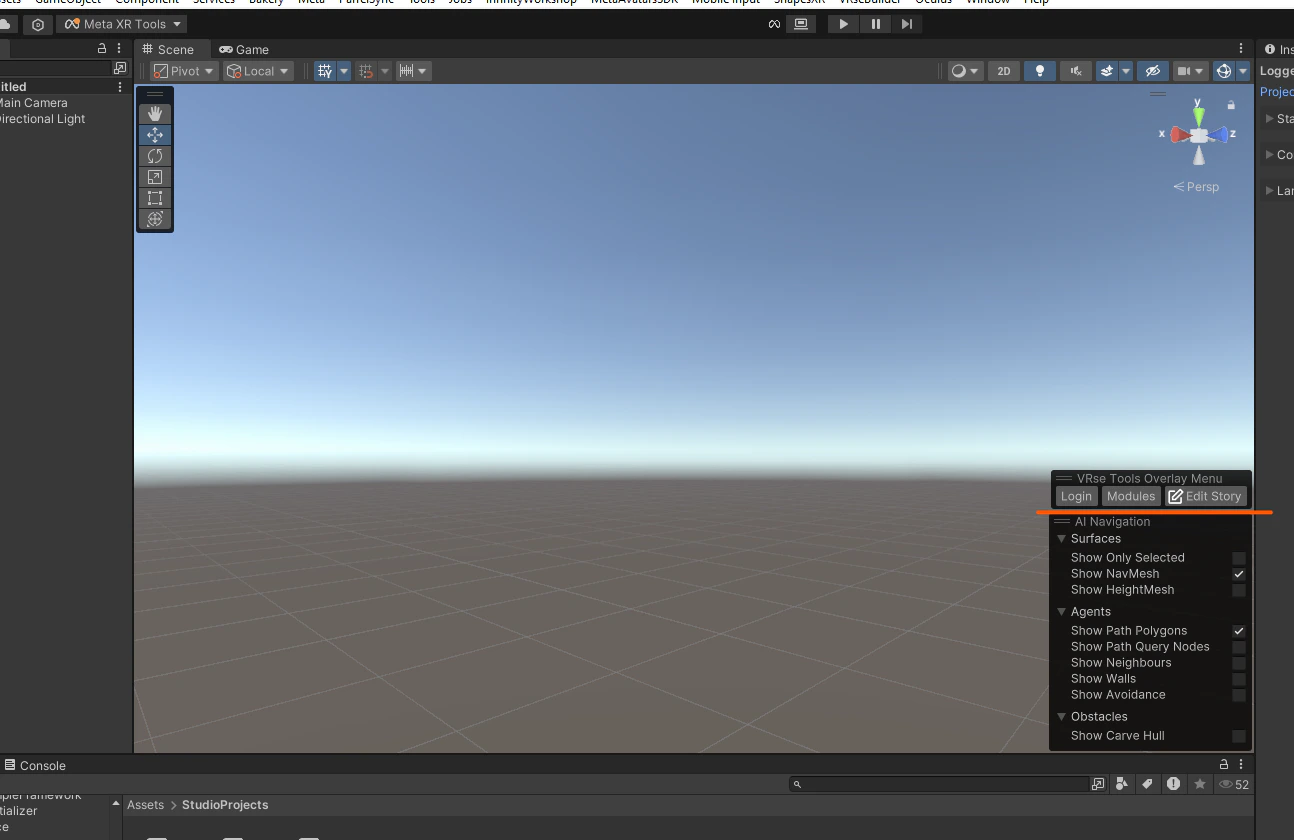 The VRse Tool Overlay provides three main options:
**Login:** Used for logging into VRseBuilder platform within Unity,Required before accessing other tools
**Modules:** Opens the **VRse Studio Projects Window** and allows project switching and module management. You can also access the development and art Unity scenes
**Edit Story:** Opens the **Story Edit Window**, This is the primary interface for experience editing also contains all tools and options for story modification
## Story Edit Window Interface
This window will help you edit and manage content for your VR story, once you have logged in
### Creator Section
The Creator section is the primary workspace for editing your VR story experiences.
#### Interface Layout
The Creator section features a **split-panel interface** with:
**Left Panel: Navigation Hierarchy**
* Hierarchical chapter and moment navigation
* Visual highlighting of current selection
* Quick access to all story elements
**Right Panel: Detailed Editing Area**
* Contextual editing interface for selected elements
* Node-based editing system
* Parameter configuration panels
**Adjustable Splitter**
* Drag to resize panels according to your workflow preferences
* Optimizes workspace organization
#### 3.1.2 Save Management
**Save Status Indicator** The save status is clearly indicated through color-coded buttons:
* **🔴 Red "Save to JSON file" button**: Current story contains unsaved changes
* **🟢 Green "Save to JSON file" button**: Story is saved and up-to-date
\*\*Save Process\*\* **Step 1: Save Changes**
1. Click the **"Save to JSON file"** button
2. A confirmation dialog will appear with:
* **Confirmation button**: Proceed with saving
* **Cancel button**: Cancel the save operation
**Step 2: Confirm Save**
1. Click **Confirmation** to save changes
2. Button will turn green to indicate successful save
#### 3.1.3 Load Management
\*\*Load from JSON\*\* **Purpose**: Restore previously saved story state **Use Case**: When you want to discard current changes and revert to last saved version
**Step 1: Load Saved Version**
1. Click **"Load from JSON file"** button
2. Current unsaved changes will be discarded
3. Story will revert to last saved state
\> **Warning**: Loading from JSON will permanently discard any unsaved changes. Ensure you want to lose current modifications before proceeding.
#### 3.1.4 File Management
\*\*Open JSON File\*\* **Purpose**: View the raw JSON file containing your story data
**Step 1: Open File**
1. Click **"Open File"** button
2. JSON file will open in your default text editor
3. View raw story structure and data
\> **Note**: This is for viewing purposes. Direct editing of JSON files outside the Story Editor is not recommended.
#### 3.1.5 Voice Over Tool
The Voice Over (VO) Tool provides comprehensive audio generation and management capabilities for your VR experiences.
\*\*Accessing the VO Tool\*\* **Step 1: Open VO Preview**
1. In the Creator section, click the **"VO Preview"** button
2. The Voice Over Previews window will open
**VO Preview Window Interface** The VO Preview window organizes all voice-over content by story structure:
**Hierarchical Organization**
* Voice-overs grouped by chapter and moment
* Clear visual hierarchy for easy navigation
* Expandable sections for detailed view
**Status Indicators**
* **Pending Generation**: VOs awaiting generation
* **Generated**: Completed voice-over files
**VO Generation Process**
*Individual VO Generation* **For Pending VOs:**
1. Locate the VO marked as pending
2. Click the **"Generate Pending VO"** button (yellow text) below the specific VO
3. System will generate audio files for all pending voice-overs
\> **Note**: Currently, this button generates all pending VOs in the story, not just the individual VO. Individual generation functionality will be updated in future releases.
*Bulk VO Generation* **For All Pending VOs:**
1. Scroll to the bottom of the VO Preview window
2. Click the **"Generate Pending \\\ VOs"** button
3. System will generate all pending voice-overs in sequence
**VO Testing and Playback**
*Testing Generated VOs* **Step 1: Locate Generated VO**
1. Find the VO that has been successfully generated
2. Generated VOs will show a play button at the bottom
**Step 2: Play Audio**
1. Click the **play button** to test the audio
2. Listen to ensure quality and accuracy
3. Use for final verification before deployment
**Advanced VO Options**
*Regeneration Toggle* **Fresh Generation Option**
1. Locate the toggle below the "Generate Pending VOs" button
2. **Enable toggle**: Delete existing VOs and regenerate all
3. **Disable toggle**: Only generate missing VOs
**Use Cases for Regeneration:**
* Voice quality improvements
* Script changes requiring new audio
* Different voice settings or parameters
*Status Messages* **All VOs Generated**
* When all VOs are complete, window displays: **"No pending VOs to be generated."** (green text)
* Indicates story is ready for deployment
**Pending VOs**
* Clear count of remaining VOs to generate
* Progress tracking for large stories
#### 3.1.6 Node-Based Editing System
The Creator section uses an advanced node-based editing system for intuitive story creation.
**Key Features**
**Template-Based Node Selection**
* Choose from pre-defined node templates
* No dependency on external node libraries
* Consistent parameter structure across node types
**Contextual Parameter Editors**
* Parameter editors adapt based on selected node type
* Organized sections for different parameter categories
* Expandable sections for better data organization
**Enhanced Data Display**
* Improved readability of node data sections
* Expandable parameter groups
* Clear visual hierarchy for complex data structures
**Node Types and Parameters**
**Actions**: Execute specific behaviors in your VR experience **Triggers**: Detect user interactions and environmental changes
#### 3.1.7 Navigation System
**Enhanced Chapter and Moment Organization**
**Hierarchical Structure**
* Clear chapter and moment hierarchy in left panel
* Visual indicators for current selection
* Expandable/collapsible sections for better organization
**Quick Navigation**
* Click any chapter or moment for instant navigation
* Visual highlighting shows current selection
* Breadcrumb navigation for complex stories
**Visual Indicators**
* **Selected elements**: Highlighted in the navigation panel
* **Modified elements**: Visual indicators for unsaved changes
#### 3.1.8 Copy/Paste Functionality
The Creator section supports comprehensive copy/paste operations for efficient story development.
**Supported Operations**
**Chapter Level**
* Copy entire chapters with all contained moments
* Paste chapters to duplicate story sections
* Maintain all node relationships and parameters
**Moment Level**
* Copy individual moments
* Paste moments within same or different chapters
* Preserve all actions and triggers
**Node Level**
* Copy individual nodes (actions, triggers)
* Paste nodes within same or different moments
* Maintain all parameter settings
**Context Menu Operations**
**Three-Dot Menu provides:**
* **Copy**: Copy selected element
* **Paste**: Paste previously copied element
* **Remove**: Delete selected elements
**Copy/Paste Workflow**
**Step 1: Select Element**
1. Click on the three-dot menu (⋯) next to the element you want to copy
2. Select **Copy** from the menu
**Step 2: Navigate to Destination**
1. Navigate to the desired location in your story
2. Click on the three-dot menu (⋯) in the target location
**Step 3: Paste Element**
1. Select **Paste** from the menu
2. Element will be duplicated with all parameters intact
### 3.2 Report Section
Analysis and reporting tools for story performance and analytics.
*(Coming in future update)*
### 3.3 References Section
Asset and reference management for story components.
*(Coming in future update)*
### 3.4 VRse Objects Section
Object and component management for VR experiences.
*(Coming in future update)*
## Story Editing Workflow
### 4.1 Basic Editing Process
**Step 1: Open Story Editor**
1. Access VRse Tool Overlay
2. Click **Edit Story**
3. Select **Creator** section
**Step 2: Navigate to Content**
1. Use left panel to navigate to desired chapter/moment
2. Click on target element for editing
3. Right panel will display editing interface
**Step 3: Edit Content**
1. Add/modify nodes using template system
2. Configure parameters in contextual editors
3. Use copy/paste for efficiency
**Step 4: Save Changes**
1. Monitor save status indicator
2. Click **"Save to JSON file"** when ready
3. Confirm save operation
### 4.2 Advanced Editing Techniques
#### Working with Templates
**Using Node Templates**
1. Select "Add Node" in your moment
2. Choose appropriate template from dropdown
3. Configure parameters using contextual editors
4. Save changes
#### Managing Complex Stories
**Chapter Organization**
* Use descriptive chapter names
* Organize related moments together
* Utilize copy/paste for similar content
**Moment Structure**
* Keep moments focused on single interactions
* Use clear naming conventions
* Document complex trigger/action relationships
***
## 5. Advanced Features
### 5.1 Custom Node Creation
For advanced users, new nodes can be added to extend the system's capabilities.
#### Adding New Nodes
**Step 1: Access Node Template Data**
1. Navigate to: `Assets/Core/NoCode/DataVRseHelper/NodeTemplateData.asset`
2. Open the asset in Unity Inspector
**Step 2: Define Node Structure**
1. **Node Name**: Specify the name for your new node
2. **Options**: Add different option types for the node
3. **Parameters**: Define required parameters for each option
**Step 3: Parameter Configuration** For each parameter, specify:
* **Parameter Name**: Key identifier
* **Data Type**: Type of value (string, int, float, bool, etc.)
* **Default Value**: Initial value when node is created
#### Parameter Types
**Supported Data Types:**
* **String**: Text-based parameters
* **Integer**: Whole number values
* **Float**: Decimal number values
* **Boolean**: True/false toggles
* **GameObject**: Scene object references
* **Vector3**: 3D position/rotation/scale values
### 5.2 Template System Benefits
**Consistency**: All nodes follow standardized parameter structures **Efficiency**: Rapid node creation without manual parameter entry **Maintainability**: Centralized node definitions for easy updates **Extensibility**: Easy addition of new node types as neededead m
The VRse Tool Overlay provides three main options:
**Login:** Used for logging into VRseBuilder platform within Unity,Required before accessing other tools
**Modules:** Opens the **VRse Studio Projects Window** and allows project switching and module management. You can also access the development and art Unity scenes
**Edit Story:** Opens the **Story Edit Window**, This is the primary interface for experience editing also contains all tools and options for story modification
## Story Edit Window Interface
This window will help you edit and manage content for your VR story, once you have logged in
### Creator Section
The Creator section is the primary workspace for editing your VR story experiences.
#### Interface Layout
The Creator section features a **split-panel interface** with:
**Left Panel: Navigation Hierarchy**
* Hierarchical chapter and moment navigation
* Visual highlighting of current selection
* Quick access to all story elements
**Right Panel: Detailed Editing Area**
* Contextual editing interface for selected elements
* Node-based editing system
* Parameter configuration panels
**Adjustable Splitter**
* Drag to resize panels according to your workflow preferences
* Optimizes workspace organization
#### 3.1.2 Save Management
**Save Status Indicator** The save status is clearly indicated through color-coded buttons:
* **🔴 Red "Save to JSON file" button**: Current story contains unsaved changes
* **🟢 Green "Save to JSON file" button**: Story is saved and up-to-date
\*\*Save Process\*\* **Step 1: Save Changes**
1. Click the **"Save to JSON file"** button
2. A confirmation dialog will appear with:
* **Confirmation button**: Proceed with saving
* **Cancel button**: Cancel the save operation
**Step 2: Confirm Save**
1. Click **Confirmation** to save changes
2. Button will turn green to indicate successful save
#### 3.1.3 Load Management
\*\*Load from JSON\*\* **Purpose**: Restore previously saved story state **Use Case**: When you want to discard current changes and revert to last saved version
**Step 1: Load Saved Version**
1. Click **"Load from JSON file"** button
2. Current unsaved changes will be discarded
3. Story will revert to last saved state
\> **Warning**: Loading from JSON will permanently discard any unsaved changes. Ensure you want to lose current modifications before proceeding.
#### 3.1.4 File Management
\*\*Open JSON File\*\* **Purpose**: View the raw JSON file containing your story data
**Step 1: Open File**
1. Click **"Open File"** button
2. JSON file will open in your default text editor
3. View raw story structure and data
\> **Note**: This is for viewing purposes. Direct editing of JSON files outside the Story Editor is not recommended.
#### 3.1.5 Voice Over Tool
The Voice Over (VO) Tool provides comprehensive audio generation and management capabilities for your VR experiences.
\*\*Accessing the VO Tool\*\* **Step 1: Open VO Preview**
1. In the Creator section, click the **"VO Preview"** button
2. The Voice Over Previews window will open
**VO Preview Window Interface** The VO Preview window organizes all voice-over content by story structure:
**Hierarchical Organization**
* Voice-overs grouped by chapter and moment
* Clear visual hierarchy for easy navigation
* Expandable sections for detailed view
**Status Indicators**
* **Pending Generation**: VOs awaiting generation
* **Generated**: Completed voice-over files
**VO Generation Process**
*Individual VO Generation* **For Pending VOs:**
1. Locate the VO marked as pending
2. Click the **"Generate Pending VO"** button (yellow text) below the specific VO
3. System will generate audio files for all pending voice-overs
\> **Note**: Currently, this button generates all pending VOs in the story, not just the individual VO. Individual generation functionality will be updated in future releases.
*Bulk VO Generation* **For All Pending VOs:**
1. Scroll to the bottom of the VO Preview window
2. Click the **"Generate Pending \\\ VOs"** button
3. System will generate all pending voice-overs in sequence
**VO Testing and Playback**
*Testing Generated VOs* **Step 1: Locate Generated VO**
1. Find the VO that has been successfully generated
2. Generated VOs will show a play button at the bottom
**Step 2: Play Audio**
1. Click the **play button** to test the audio
2. Listen to ensure quality and accuracy
3. Use for final verification before deployment
**Advanced VO Options**
*Regeneration Toggle* **Fresh Generation Option**
1. Locate the toggle below the "Generate Pending VOs" button
2. **Enable toggle**: Delete existing VOs and regenerate all
3. **Disable toggle**: Only generate missing VOs
**Use Cases for Regeneration:**
* Voice quality improvements
* Script changes requiring new audio
* Different voice settings or parameters
*Status Messages* **All VOs Generated**
* When all VOs are complete, window displays: **"No pending VOs to be generated."** (green text)
* Indicates story is ready for deployment
**Pending VOs**
* Clear count of remaining VOs to generate
* Progress tracking for large stories
#### 3.1.6 Node-Based Editing System
The Creator section uses an advanced node-based editing system for intuitive story creation.
**Key Features**
**Template-Based Node Selection**
* Choose from pre-defined node templates
* No dependency on external node libraries
* Consistent parameter structure across node types
**Contextual Parameter Editors**
* Parameter editors adapt based on selected node type
* Organized sections for different parameter categories
* Expandable sections for better data organization
**Enhanced Data Display**
* Improved readability of node data sections
* Expandable parameter groups
* Clear visual hierarchy for complex data structures
**Node Types and Parameters**
**Actions**: Execute specific behaviors in your VR experience **Triggers**: Detect user interactions and environmental changes
#### 3.1.7 Navigation System
**Enhanced Chapter and Moment Organization**
**Hierarchical Structure**
* Clear chapter and moment hierarchy in left panel
* Visual indicators for current selection
* Expandable/collapsible sections for better organization
**Quick Navigation**
* Click any chapter or moment for instant navigation
* Visual highlighting shows current selection
* Breadcrumb navigation for complex stories
**Visual Indicators**
* **Selected elements**: Highlighted in the navigation panel
* **Modified elements**: Visual indicators for unsaved changes
#### 3.1.8 Copy/Paste Functionality
The Creator section supports comprehensive copy/paste operations for efficient story development.
**Supported Operations**
**Chapter Level**
* Copy entire chapters with all contained moments
* Paste chapters to duplicate story sections
* Maintain all node relationships and parameters
**Moment Level**
* Copy individual moments
* Paste moments within same or different chapters
* Preserve all actions and triggers
**Node Level**
* Copy individual nodes (actions, triggers)
* Paste nodes within same or different moments
* Maintain all parameter settings
**Context Menu Operations**
**Three-Dot Menu provides:**
* **Copy**: Copy selected element
* **Paste**: Paste previously copied element
* **Remove**: Delete selected elements
**Copy/Paste Workflow**
**Step 1: Select Element**
1. Click on the three-dot menu (⋯) next to the element you want to copy
2. Select **Copy** from the menu
**Step 2: Navigate to Destination**
1. Navigate to the desired location in your story
2. Click on the three-dot menu (⋯) in the target location
**Step 3: Paste Element**
1. Select **Paste** from the menu
2. Element will be duplicated with all parameters intact
### 3.2 Report Section
Analysis and reporting tools for story performance and analytics.
*(Coming in future update)*
### 3.3 References Section
Asset and reference management for story components.
*(Coming in future update)*
### 3.4 VRse Objects Section
Object and component management for VR experiences.
*(Coming in future update)*
## Story Editing Workflow
### 4.1 Basic Editing Process
**Step 1: Open Story Editor**
1. Access VRse Tool Overlay
2. Click **Edit Story**
3. Select **Creator** section
**Step 2: Navigate to Content**
1. Use left panel to navigate to desired chapter/moment
2. Click on target element for editing
3. Right panel will display editing interface
**Step 3: Edit Content**
1. Add/modify nodes using template system
2. Configure parameters in contextual editors
3. Use copy/paste for efficiency
**Step 4: Save Changes**
1. Monitor save status indicator
2. Click **"Save to JSON file"** when ready
3. Confirm save operation
### 4.2 Advanced Editing Techniques
#### Working with Templates
**Using Node Templates**
1. Select "Add Node" in your moment
2. Choose appropriate template from dropdown
3. Configure parameters using contextual editors
4. Save changes
#### Managing Complex Stories
**Chapter Organization**
* Use descriptive chapter names
* Organize related moments together
* Utilize copy/paste for similar content
**Moment Structure**
* Keep moments focused on single interactions
* Use clear naming conventions
* Document complex trigger/action relationships
***
## 5. Advanced Features
### 5.1 Custom Node Creation
For advanced users, new nodes can be added to extend the system's capabilities.
#### Adding New Nodes
**Step 1: Access Node Template Data**
1. Navigate to: `Assets/Core/NoCode/DataVRseHelper/NodeTemplateData.asset`
2. Open the asset in Unity Inspector
**Step 2: Define Node Structure**
1. **Node Name**: Specify the name for your new node
2. **Options**: Add different option types for the node
3. **Parameters**: Define required parameters for each option
**Step 3: Parameter Configuration** For each parameter, specify:
* **Parameter Name**: Key identifier
* **Data Type**: Type of value (string, int, float, bool, etc.)
* **Default Value**: Initial value when node is created
#### Parameter Types
**Supported Data Types:**
* **String**: Text-based parameters
* **Integer**: Whole number values
* **Float**: Decimal number values
* **Boolean**: True/false toggles
* **GameObject**: Scene object references
* **Vector3**: 3D position/rotation/scale values
### 5.2 Template System Benefits
**Consistency**: All nodes follow standardized parameter structures **Efficiency**: Rapid node creation without manual parameter entry **Maintainability**: Centralized node definitions for easy updates **Extensibility**: Easy addition of new node types as neededead m