> ## Documentation Index
> Fetch the complete documentation index at: https://docs-vrsebuilder.autovrse.app/llms.txt
> Use this file to discover all available pages before exploring further.
# Making Builds
> How to make builds for your VR experience
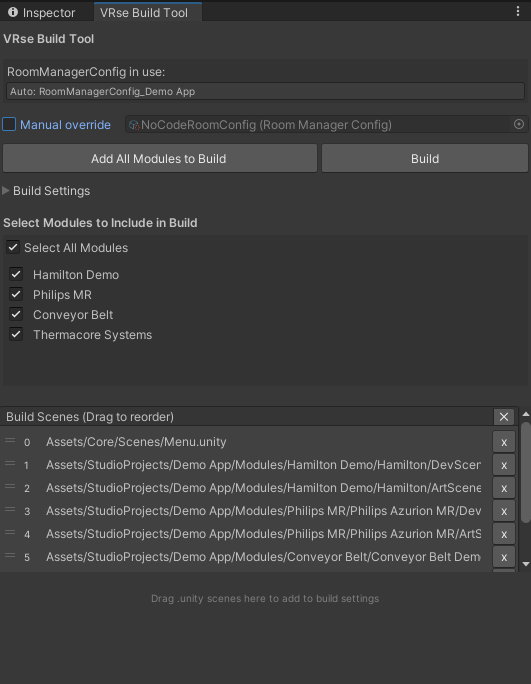
## Build Tool
The VRse Build Tool is your one-stop solution for creating VR applications. Think of it as a smart assistant that helps you package all your VR content, configure your app settings, and generate the final application file that can be deployed to VR headsets.
 You can access the tool in the following ways:
On the top toolbar, go to **VRseBuilder → Build Tool**
Open the VRse Projects Window on the top toolbar
Navigate to on the top right of the window, **Menu → Build Tool**
### Project Management
Automatically detects and manages project configurations for streamlined workflow management.
* Multi-project workflows
* Project switching
* Configuration management across different VR experiences
**Capabilities**
* **Auto-detection of current project:** Automatically identifies the active VR project
* **Manual override option:** Switch between different project configurations
* **Project-specific settings management:** Maintains separate configurations per project
**How to Use**
1. The tool automatically picks up your current project
2. If you need a different project, check "Manual override"
3. Select the desired project from available options
### Content Management
Streamlined content addition and organization system for managing modules and scenes in your build.
* Content curation for specific builds
* Selective builds for testing
* Scene management and organization
**Capabilities**
* **Bulk addition of all project modules:** Add entire project content with one click
* **Individual scene selection:** Granular control over scene inclusion
* **Drag-and-drop scene integration:** Intuitive scene management
* **Scene ordering and organization:** Control the sequence of content
**How to Use**
1. Click **"Add All Modules to Build"** to include all project content
2. Or drag individual scene files into the bottom area to add them manually
3. Use the scene management interface to organize content
### Module Selection System
Granular content control allowing selective inclusion/exclusion of project modules.
* Testing specific modules
* Creating partial builds
* Content filtering for different audiences
**Capabilities**
* **Select all modules functionality:** Include everything with one click
* **Individual module toggle controls:** Checkbox-based selection
* **Real-time build preview:** See what will be included
* **Flexible content filtering:** Choose exactly what goes in your build
**How to Use**
1. Use **"Select All Modules"** to include everything at once
2. Or toggle individual modules on/off using the checkboxes
3. Only checked modules will appear in your final build
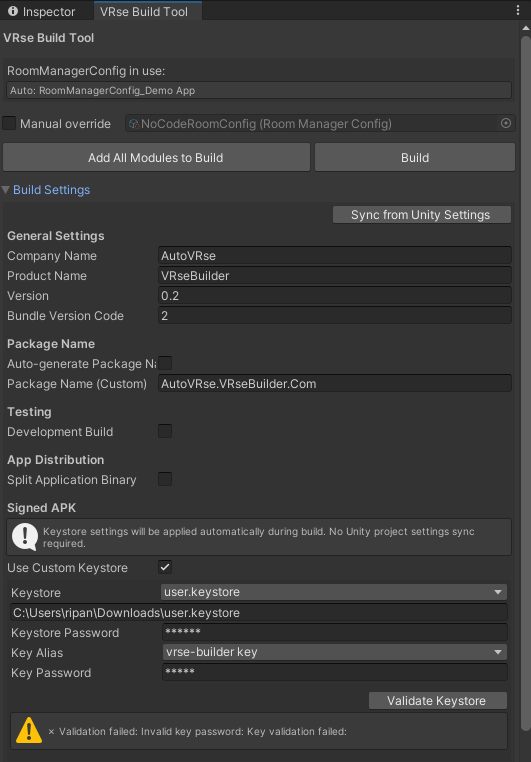
### Application Configuration
Centralized configuration system for application metadata and build settings.
* Branding and identity management
* Version control and tracking
* Deployment preparation
You can access the tool in the following ways:
On the top toolbar, go to **VRseBuilder → Build Tool**
Open the VRse Projects Window on the top toolbar
Navigate to on the top right of the window, **Menu → Build Tool**
### Project Management
Automatically detects and manages project configurations for streamlined workflow management.
* Multi-project workflows
* Project switching
* Configuration management across different VR experiences
**Capabilities**
* **Auto-detection of current project:** Automatically identifies the active VR project
* **Manual override option:** Switch between different project configurations
* **Project-specific settings management:** Maintains separate configurations per project
**How to Use**
1. The tool automatically picks up your current project
2. If you need a different project, check "Manual override"
3. Select the desired project from available options
### Content Management
Streamlined content addition and organization system for managing modules and scenes in your build.
* Content curation for specific builds
* Selective builds for testing
* Scene management and organization
**Capabilities**
* **Bulk addition of all project modules:** Add entire project content with one click
* **Individual scene selection:** Granular control over scene inclusion
* **Drag-and-drop scene integration:** Intuitive scene management
* **Scene ordering and organization:** Control the sequence of content
**How to Use**
1. Click **"Add All Modules to Build"** to include all project content
2. Or drag individual scene files into the bottom area to add them manually
3. Use the scene management interface to organize content
### Module Selection System
Granular content control allowing selective inclusion/exclusion of project modules.
* Testing specific modules
* Creating partial builds
* Content filtering for different audiences
**Capabilities**
* **Select all modules functionality:** Include everything with one click
* **Individual module toggle controls:** Checkbox-based selection
* **Real-time build preview:** See what will be included
* **Flexible content filtering:** Choose exactly what goes in your build
**How to Use**
1. Use **"Select All Modules"** to include everything at once
2. Or toggle individual modules on/off using the checkboxes
3. Only checked modules will appear in your final build
### Application Configuration
Centralized configuration system for application metadata and build settings.
* Branding and identity management
* Version control and tracking
* Deployment preparation
 **Capabilities**
* **Company name configuration:** Set organization branding
* **Product name setting:** Define application name
* **Version management:** Control version numbering
* **Package name handling:** Auto-generate or manual setting
* **Development build flag:** Enable testing features
* **Unity settings synchronization:** Sync with existing Unity settings
**Requirements**
* User authentication required for access
**How to Use**
1. Log in to access configuration features
2. Set the following required fields:
* **Company Name:** Your organization name
* **Product Name:** What your app will be called
* **Version:** Version number (like 1.0.0)
* **Package Name:** Can auto-generate or set manually
* **Development Build:** Check this for testing versions
3. Click "Sync from Unity Settings" to pull in current Unity settings
### Code Signing and Security
Digital signature management system specifically designed for Android deployments.
* App store deployment
* Security compliance
* Distribution preparation
**Capabilities**
* **Custom keystore integration:** Use your own signing certificates
* **Keystore file management:** Browse and select keystore files
* **Password management:** Secure handling of keystore and key passwords
* **Key alias selection:** Choose from available aliases
* **Security configuration:** Complete signing setup
**Platform Support**
* Android-specific feature
**How to Use**
1. Check **"Use Custom Keystore"**
2. Select your keystore file from the dropdown or browse for it
3. Enter your keystore password
4. Choose your key alias from the list
5. Enter your key password
### Scene Management Interface
Visual interface for managing and organizing scenes that will be included in the build.
* Scene sequencing
* Content organization
* Build optimization
**Capabilities**
* **Scene list visualization:** See all included scenes
* **Drag-and-drop reordering:** Change scene sequence
* **Scene removal functionality:** Remove unwanted scenes
* **Project navigation integration:** Quick access to scene files
* **Build order management:** Control execution sequence
**How to Use**
1. View all scenes that will be included in the build
2. Drag scenes up/down to change their order
3. Remove scenes by clicking the "x" button
4. Double-click scenes to find them in your project
### Build Generation
Automated build generation system with comprehensive user feedback and progress tracking.
* Production builds
* Testing builds
* Deployment package creation
**Capabilities**
* **One-click build initiation:** Start builds with single button
* **Output location selection:** Choose where to save builds
* **Build naming conventions:** Flexible naming options
* **Progress tracking:** Real-time build status
* **Success/error reporting:** Clear feedback on build results
* **Build completion notifications:** Know when builds are ready
**How to Use**
1. Click the **"Build"** button
2. Choose where to save your build and what to name it
3. Wait for the build to complete
4. You'll get a success or error message when done
## Legacy Build Process (Manual)
## Where can you get the latest build settings from
Before making the build make sure you have the right build settings in your project, to get this you can either switch to develop branch of the VRse builder repository, or rebase your branch with it. This should set you with the build settings required.
### Steps to make the build
These are the steps that would help make the build smoothly:
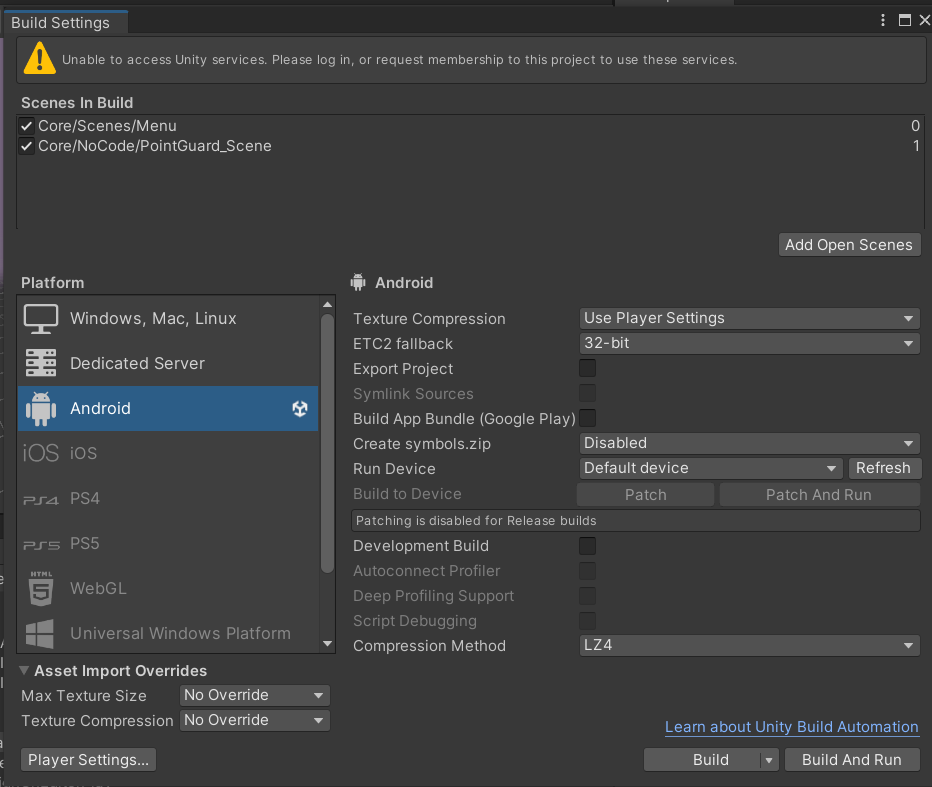
1. Check the scenes that have been added under the build settingsThe build will always start from the scene with index 0 under scenes in build.
Here you can see the scene at index is menu. So the first scene that will load as soon as the app is opened will be Menu scene. Considering this arrange keep the indexes under the scenes in build section in order. By default Menu scene is kept at index 0, this is the scene where you can select which type of room you want to join in multiplayer mode.
For the multiplayer mode keep the scene indexed from 0 to 4 as it is, after which you can start adding scenes that you want in the build.
**Capabilities**
* **Company name configuration:** Set organization branding
* **Product name setting:** Define application name
* **Version management:** Control version numbering
* **Package name handling:** Auto-generate or manual setting
* **Development build flag:** Enable testing features
* **Unity settings synchronization:** Sync with existing Unity settings
**Requirements**
* User authentication required for access
**How to Use**
1. Log in to access configuration features
2. Set the following required fields:
* **Company Name:** Your organization name
* **Product Name:** What your app will be called
* **Version:** Version number (like 1.0.0)
* **Package Name:** Can auto-generate or set manually
* **Development Build:** Check this for testing versions
3. Click "Sync from Unity Settings" to pull in current Unity settings
### Code Signing and Security
Digital signature management system specifically designed for Android deployments.
* App store deployment
* Security compliance
* Distribution preparation
**Capabilities**
* **Custom keystore integration:** Use your own signing certificates
* **Keystore file management:** Browse and select keystore files
* **Password management:** Secure handling of keystore and key passwords
* **Key alias selection:** Choose from available aliases
* **Security configuration:** Complete signing setup
**Platform Support**
* Android-specific feature
**How to Use**
1. Check **"Use Custom Keystore"**
2. Select your keystore file from the dropdown or browse for it
3. Enter your keystore password
4. Choose your key alias from the list
5. Enter your key password
### Scene Management Interface
Visual interface for managing and organizing scenes that will be included in the build.
* Scene sequencing
* Content organization
* Build optimization
**Capabilities**
* **Scene list visualization:** See all included scenes
* **Drag-and-drop reordering:** Change scene sequence
* **Scene removal functionality:** Remove unwanted scenes
* **Project navigation integration:** Quick access to scene files
* **Build order management:** Control execution sequence
**How to Use**
1. View all scenes that will be included in the build
2. Drag scenes up/down to change their order
3. Remove scenes by clicking the "x" button
4. Double-click scenes to find them in your project
### Build Generation
Automated build generation system with comprehensive user feedback and progress tracking.
* Production builds
* Testing builds
* Deployment package creation
**Capabilities**
* **One-click build initiation:** Start builds with single button
* **Output location selection:** Choose where to save builds
* **Build naming conventions:** Flexible naming options
* **Progress tracking:** Real-time build status
* **Success/error reporting:** Clear feedback on build results
* **Build completion notifications:** Know when builds are ready
**How to Use**
1. Click the **"Build"** button
2. Choose where to save your build and what to name it
3. Wait for the build to complete
4. You'll get a success or error message when done
## Legacy Build Process (Manual)
## Where can you get the latest build settings from
Before making the build make sure you have the right build settings in your project, to get this you can either switch to develop branch of the VRse builder repository, or rebase your branch with it. This should set you with the build settings required.
### Steps to make the build
These are the steps that would help make the build smoothly:
1. Check the scenes that have been added under the build settingsThe build will always start from the scene with index 0 under scenes in build.
Here you can see the scene at index is menu. So the first scene that will load as soon as the app is opened will be Menu scene. Considering this arrange keep the indexes under the scenes in build section in order. By default Menu scene is kept at index 0, this is the scene where you can select which type of room you want to join in multiplayer mode.
For the multiplayer mode keep the scene indexed from 0 to 4 as it is, after which you can start adding scenes that you want in the build.
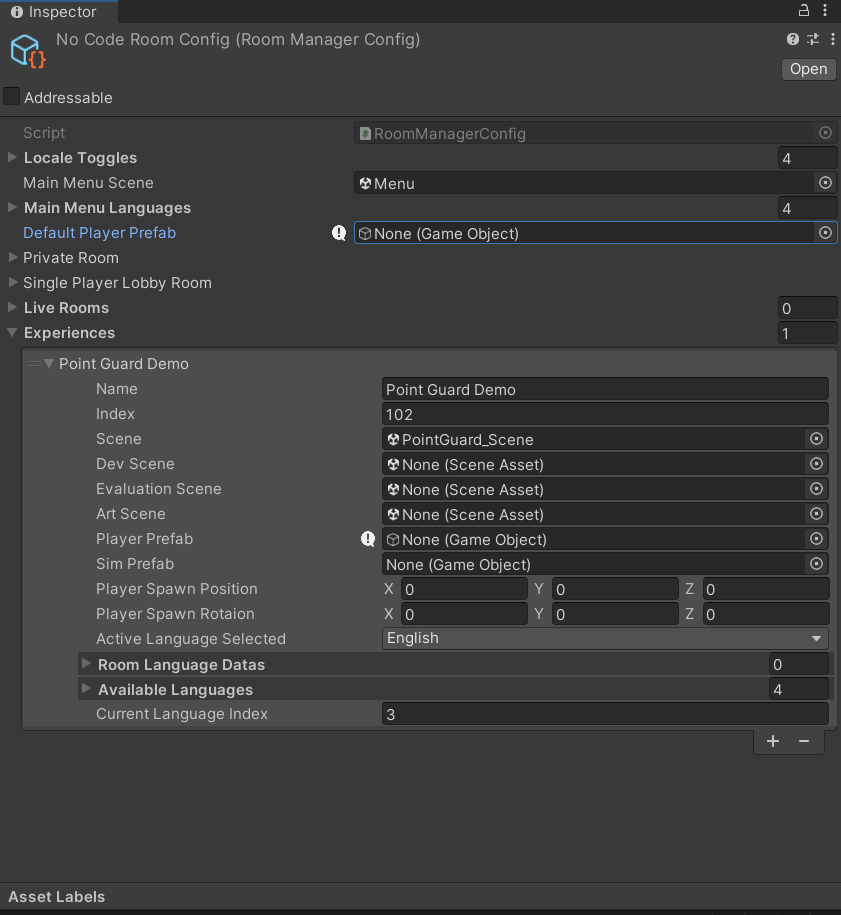
 1. Now that we have added all the scenes to the build settings the experience needs to be added to the Room manager config file. You can do this simply by adding new experience in the list and giving references for the experience. This config file can be found at
`Assets/Core/RoomManagerConfig.asset`
1. Now that we have added all the scenes to the build settings the experience needs to be added to the Room manager config file. You can do this simply by adding new experience in the list and giving references for the experience. This config file can be found at
`Assets/Core/RoomManagerConfig.asset`
 1. You can test it starting from Menu scene now, if the experience you have added is working as expected. If all the things okay. We need to make some small checks before making the build now. Go to Build Settings → Player Settings .
For product name you can give it the name for the purpose you are making the build for.
There are two types of build that can be made :
1. **Development build (Unsigned)** : Incase this build just for internal purposes not meant to be published on applab or send to the client. You can it as development build which would mean no signing of the apk is required. Untick Custom Keystore option in publishing setting and tick Development build Tick while making the build.
2. **Signed Build :** This builds are used to publish on applab or send to the client we use keys to sign them.
Once this is sorted you can start the build by opening the build settings menu and clicking on build option.
This should give you an .apk file that can be installed on the headset.
### Things to remember after making the build
Make sure you only push build settings to your branch if they are approved and required on develop. Other wise you can discard the build settings or commit them if them it is a project branch and is not suppose to merge with develop anytime.
1. You can test it starting from Menu scene now, if the experience you have added is working as expected. If all the things okay. We need to make some small checks before making the build now. Go to Build Settings → Player Settings .
For product name you can give it the name for the purpose you are making the build for.
There are two types of build that can be made :
1. **Development build (Unsigned)** : Incase this build just for internal purposes not meant to be published on applab or send to the client. You can it as development build which would mean no signing of the apk is required. Untick Custom Keystore option in publishing setting and tick Development build Tick while making the build.
2. **Signed Build :** This builds are used to publish on applab or send to the client we use keys to sign them.
Once this is sorted you can start the build by opening the build settings menu and clicking on build option.
This should give you an .apk file that can be installed on the headset.
### Things to remember after making the build
Make sure you only push build settings to your branch if they are approved and required on develop. Other wise you can discard the build settings or commit them if them it is a project branch and is not suppose to merge with develop anytime.