> ## Documentation Index
> Fetch the complete documentation index at: https://docs-vrsebuilder.autovrse.app/llms.txt
> Use this file to discover all available pages before exploring further.
# Collect Feedback in VR
> Allow users to leave feedback with voice and screenshot while playing your experience
## Overview
The **In-VR Feedback System** allows users to capture feedback while actively playing a VR module. Users can record **voice feedback** (with automatic transcription) and capture **screenshots**, all without exiting the VR experience. Feedback is automatically uploaded and linked to the active session in Pulse.
***
## How the Feedback System Works
When a user starts a Story, a feedback popup appears automatically in front of them. This popup provides quick access to:
* **Voice recording** — Record spoken feedback, which is transcribed to text
* **Screenshot capture** — Take snapshots of the current VR view
* **Feedback gallery** — Review all saved feedback (appears after first feedback is saved)
All saved feedback is packaged with the current Session ID and uploaded to **Pulse**, where trainers and stakeholders can review it alongside the module run.
***
## 1. Enable the Feedback System
Before testing feedback functionality, enable the service in your Dev Scene.
1. Locate **FrameworkSystems** in the Dev Scene hierarchy.
2. Expand it and select the **VR Feedback System** child prefab.
3. In the Inspector, enable the **`Enable Feedback Service`** flag.
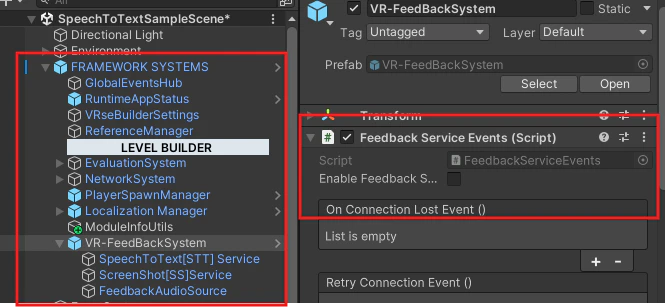 > **Note:** The feedback system will not function unless this flag is enabled.
> **Important:** The In-VR Feedback System is automatically disabled in multiplayer mode.
***
## 2. Configure Backend Connection
The feedback system requires a valid connection to Pulse and a Session ID to upload data.
Check out [this section](/guides/unity-usage#configure-project) for more information on how to do it.
### Requirements
* Module is **connected to Pulse**
* **Valid Session ID** is generated (created when launching from Menu Scene)
* All **backend URLs and configuration** are correctly set
> **Note:** The feedback system will not function unless this flag is enabled.
> **Important:** The In-VR Feedback System is automatically disabled in multiplayer mode.
***
## 2. Configure Backend Connection
The feedback system requires a valid connection to Pulse and a Session ID to upload data.
Check out [this section](/guides/unity-usage#configure-project) for more information on how to do it.
### Requirements
* Module is **connected to Pulse**
* **Valid Session ID** is generated (created when launching from Menu Scene)
* All **backend URLs and configuration** are correctly set
 > **Important:** Always launch and test the module from the **Menu Scene**. The Session ID is generated at this point and is required for all feedback uploads. If the session is invalid or missing, feedback data will not be accepted by the backend.
***
## 3. Capture Feedback at Runtime
Once the module is running, users can capture feedback without interrupting their experience.
### Feedback Popup
After starting the Story, a feedback popup appears automatically in front of the player. No additional interaction is required to trigger it.
### Voice Feedback
1. Tap the **Mic** button on the feedback popup to start recording.
> **Important:** Always launch and test the module from the **Menu Scene**. The Session ID is generated at this point and is required for all feedback uploads. If the session is invalid or missing, feedback data will not be accepted by the backend.
***
## 3. Capture Feedback at Runtime
Once the module is running, users can capture feedback without interrupting their experience.
### Feedback Popup
After starting the Story, a feedback popup appears automatically in front of the player. No additional interaction is required to trigger it.
### Voice Feedback
1. Tap the **Mic** button on the feedback popup to start recording.
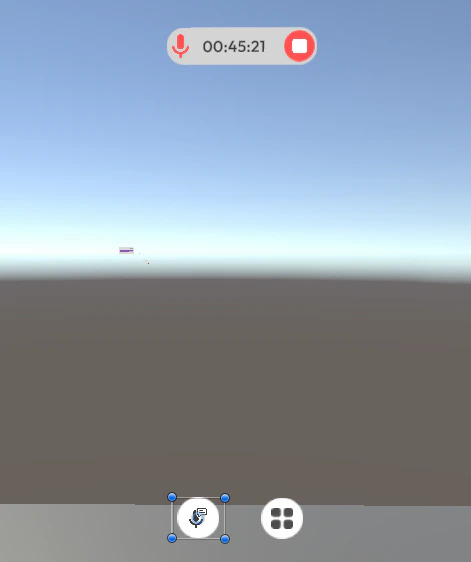 2. Speak your feedback naturally. Recording begins immediately.
3. Tap **Stop Recording** when finished.
4. Wait for **speech-to-text transcription** to complete.
5. Review the transcription and tap **Save** to keep it, or **Discard** to delete it.
> **Note:** Transcription supports multiple languages including English, Hindi, and Tamil.
### Screenshot Capture
1. Tap the **Camera** icon on the feedback popup.
2. Speak your feedback naturally. Recording begins immediately.
3. Tap **Stop Recording** when finished.
4. Wait for **speech-to-text transcription** to complete.
5. Review the transcription and tap **Save** to keep it, or **Discard** to delete it.
> **Note:** Transcription supports multiple languages including English, Hindi, and Tamil.
### Screenshot Capture
1. Tap the **Camera** icon on the feedback popup.
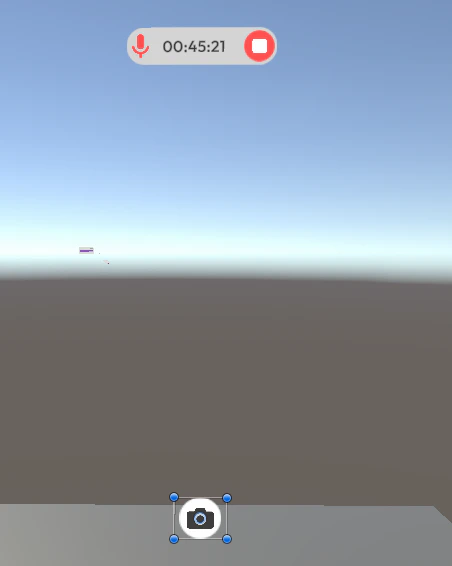 2. A screenshot is captured and previewed.
3. Tap **Save** to keep the screenshot, or **Discard** to delete it.
4. Repeat to capture additional screenshots as needed.
> **Tip:** You can capture multiple screenshots during a session. All saved screenshots are accessible in the Feedback Gallery.
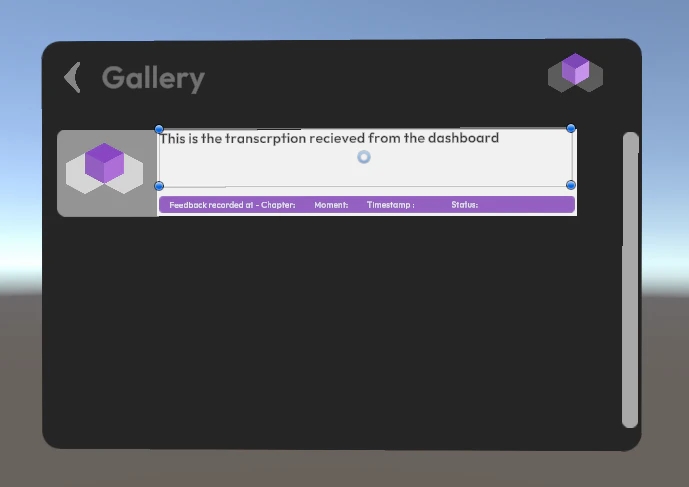
### Feedback Gallery
After saving your first piece of feedback, the **Gallery** button appears on the popup.
Tap it to open the feedback gallery, which displays:
* All saved screenshots
* All saved voice transcriptions
2. A screenshot is captured and previewed.
3. Tap **Save** to keep the screenshot, or **Discard** to delete it.
4. Repeat to capture additional screenshots as needed.
> **Tip:** You can capture multiple screenshots during a session. All saved screenshots are accessible in the Feedback Gallery.
### Feedback Gallery
After saving your first piece of feedback, the **Gallery** button appears on the popup.
Tap it to open the feedback gallery, which displays:
* All saved screenshots
* All saved voice transcriptions
 ***
## 4. View Feedback in Pulse
All saved feedback is automatically uploaded to the backend with the active Session ID.
To review feedback:
1. Open the module in **Pulse**.
2. A popup panel displays all feedback entries for that session.
3. Review screenshots and transcriptions linked to the module run.
***
## 4. View Feedback in Pulse
All saved feedback is automatically uploaded to the backend with the active Session ID.
To review feedback:
1. Open the module in **Pulse**.
2. A popup panel displays all feedback entries for that session.
3. Review screenshots and transcriptions linked to the module run.
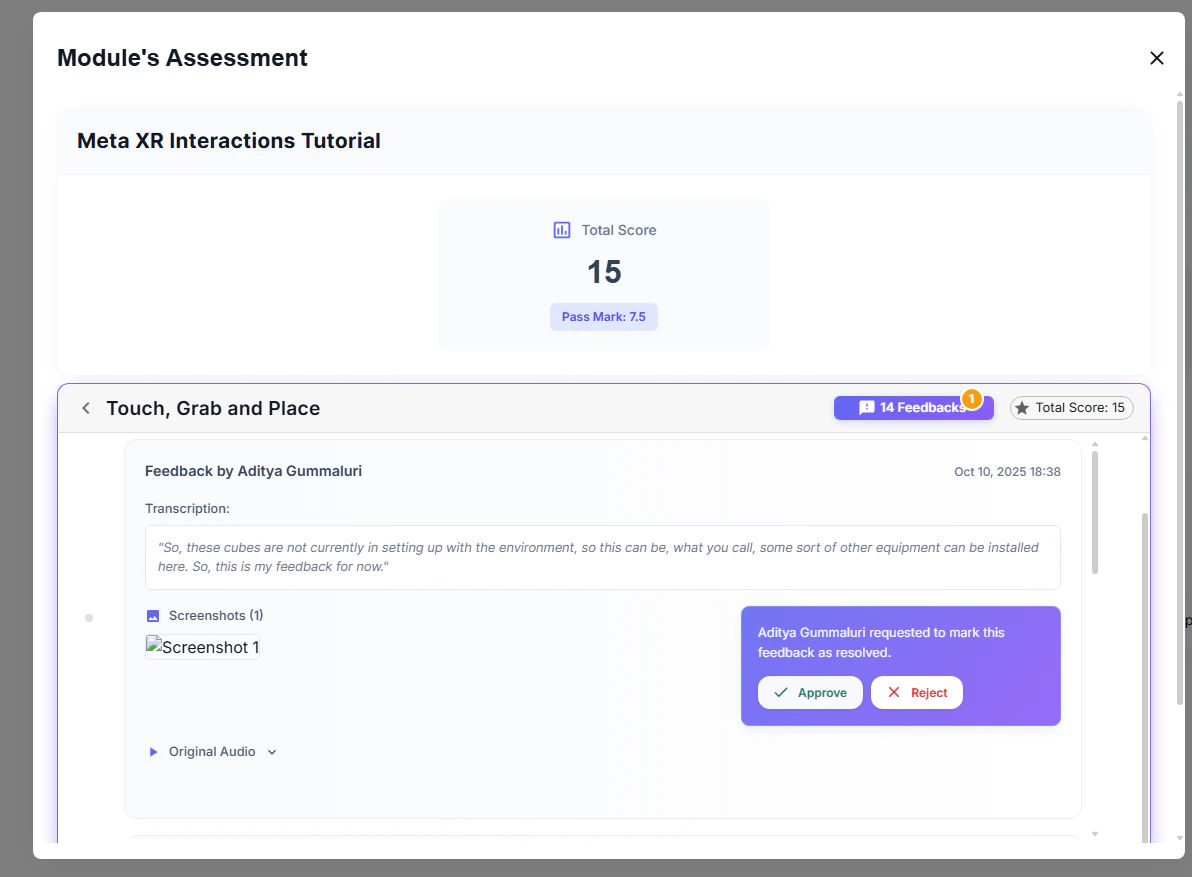 This allows trainers, reviewers, and stakeholders to analyze feedback directly against the specific module session.